App Site Management
The App Site Management section in AlertWise allows you to add new websites or applications, update their details, or delete them entirely from your account. This guide covers all three operations in detail.
1. Add a New Site (Create App)
Section titled “1. Add a New Site (Create App)”Begin your journey with AlertWise by creating your first website or app. Follow these steps for a smooth integration.
Step 1: Access the Add Site Form
Section titled “Step 1: Access the Add Site Form”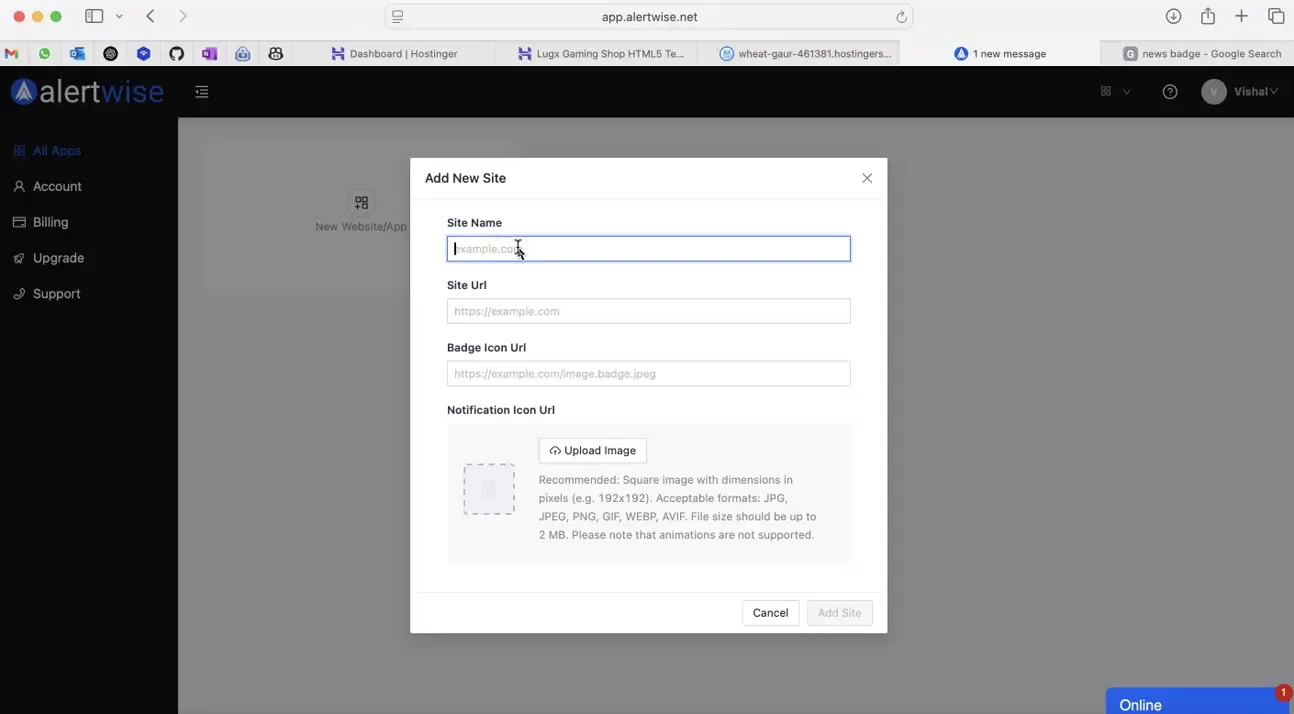
After signing in, click on New Website or App. You’ll see the Add New Site form.
Step 2: Enter Basic Information
Section titled “Step 2: Enter Basic Information”
- Site Name: For example,
News Blogor any name you choose. - Site URL: Paste your website URL in full format (e.g.,
https://example.com).
Step 3: Add Icons
Section titled “Step 3: Add Icons”
- Badge Icon URL — URL for the badge image used in notifications.
- Notification Icon URL — Recommended: square image, 192x192px, up to 2 MB. Supported formats: JPG, JPEG, PNG, GIF, WEBP, AVIF (animations not supported).
Step 4: Upload Images
Section titled “Step 4: Upload Images”
You can choose:
- Recent Files – Select from files already uploaded.
- Upload – Drag & drop or click to select a file from your device.
- External Image URL – Paste a direct link to your image.
Step 5: Complete Site Creation
Section titled “Step 5: Complete Site Creation”Click Add Site. You may see a message that the app is not yet connected. Proceed to install the integration code.
Step 6: Integrate with Your Website
Section titled “Step 6: Integrate with Your Website”Option A — Website Integration
Section titled “Option A — Website Integration”
- Copy the provided script and paste it into the
<head>section of your website. - Save the file and refresh your site.
Option B — Install Service Worker
Section titled “Option B — Install Service Worker”Download the
serviceworker.jsfile from the installation instructions.
Place it in your root directory (e.g.,
/public_html/).
If direct download isn’t possible, copy the file content manually and create
serviceworker.jsin the root directory, then paste the code.
Step 7: Verify Installation
Section titled “Step 7: Verify Installation”
- Refresh your site’s homepage.
- Look for the notification permission prompt.
2. Update an Existing Site
Section titled “2. Update an Existing Site”The Update Site feature allows you to change your app or website’s configuration without deleting it.
Step 1: Access Your Site
Section titled “Step 1: Access Your Site”- Locate the site you want to modify.
- Go to Site Config in your AlertWise dashboard.
Step 2: Update Site Configuration
Section titled “Step 2: Update Site Configuration”
You’ll see the Site Configuration form with the following fields:
- Site Name - Update your site’s display name.
- Site URL - Change the domain or update the website link.
- Badge Icon URL - Update the badge image used in notifications.
- Notification Icon URL - Replace the notification icon (square image recommended, 192x192px, up to 2 MB).
Use the image options:
- Recent Files
- Upload
- External Image URL
Step 3: Save Changes
Section titled “Step 3: Save Changes”After making changes:
- Click Save.
- Your updates will be applied immediately.
- If the integration code changes, ensure you update it on your website.
3. Delete an Application
Section titled “3. Delete an Application”Step 1: Select the App to Delete
Section titled “Step 1: Select the App to Delete”Click the delete icon next to the app name.

Step 2: Confirm Deletion
Section titled “Step 2: Confirm Deletion”You will see a prompt:

Step 3: Delete the App
Section titled “Step 3: Delete the App”Type the exact app name in the confirmation box and click Delete. The app will be permanently removed from your AlertWise account.
By using these features, you can easily manage your sites within AlertWise, keeping your integrations organized and up to date.